Adding Attic Insulation? Address Air Leaks and Moisture First
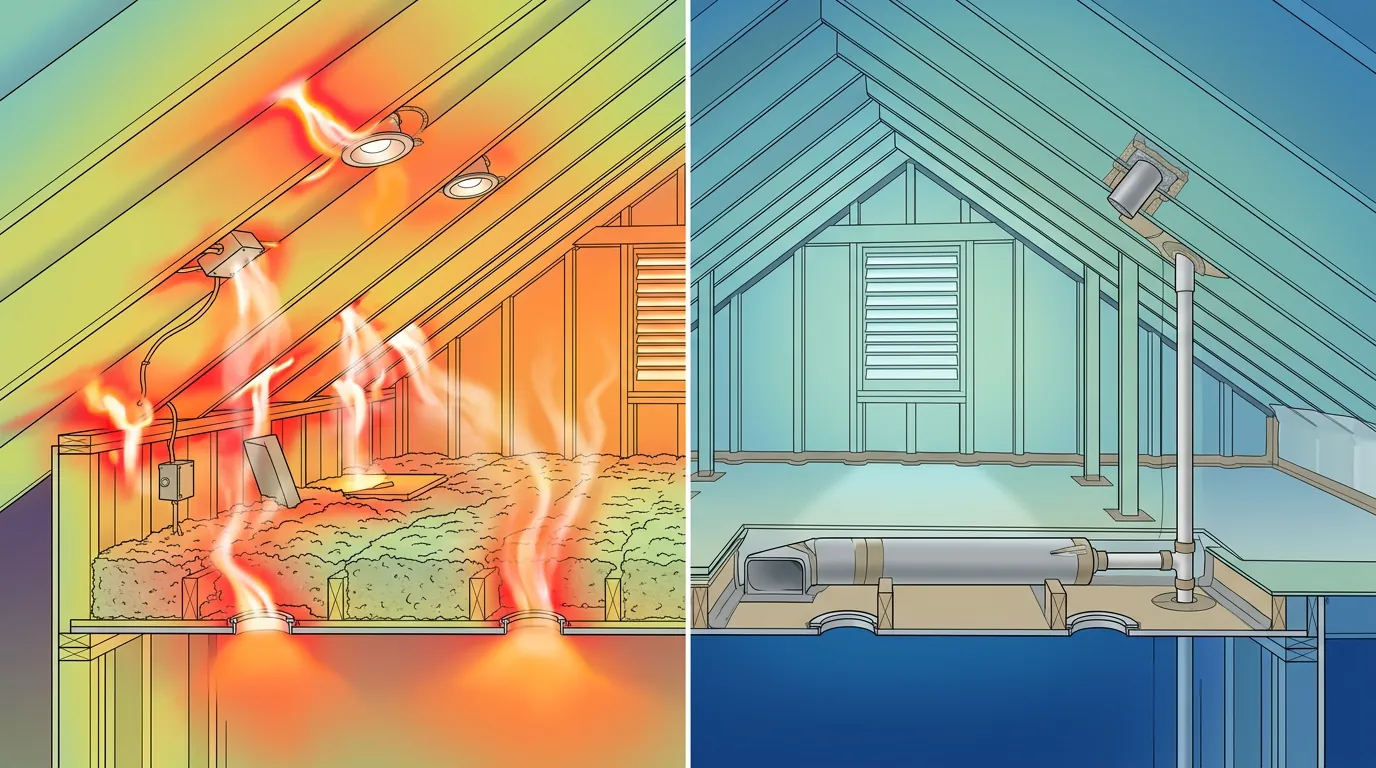
Adding attic insulation can make a home more comfortable, but it is not a cure for every hot upstairs bedroom or cold ceiling. Insulation slows heat flow through building materials. It does not reliably stop air moving through gaps, redirect a bathroom fan that empties into the attic or repair flashing that lets rain reach roof framing. Covering those problems can make them harder to find while leaving the house drafty, damp or expensive to condition.
For homeowners planning an insulation project in 2026, the useful first purchase may be an inspection rather than another load of material. The right sequence is to identify the attic's design, investigate moisture, correct exhaust and air leakage, protect ventilation and fire clearances, and then choose insulation. That sequence matters whether you hire a contractor or handle limited preparation yourself. An attic that looks dry on one summer afternoon may still have winter condensation or an intermittent roof leak.
1. Identify where the attic belongs in the building enclosure
Start by determining whether your attic is supposed to be outside or inside the home's conditioned enclosure. In a conventional vented attic, insulation generally belongs at the attic floor, with an air barrier separating the living space below. Outdoor air moves through designed attic vents. In an unvented assembly, the thermal and air-control layers usually follow the roofline, and moisture control requires a different approach. Do not mix these strategies casually.
Existing material can obscure that distinction. A previous owner may have installed foam against roof decking while leaving vents open, or added floor insulation without addressing equipment at the roofline. Ask a qualified contractor to identify the intended assembly before making changes. Also check whether upstairs discomfort reflects leaky HVAC ducts, inadequate return airflow or solar gain through windows. More attic insulation will not necessarily correct those issues. A home-energy assessment can help separate enclosure problems from equipment problems.
- Locate the existing insulation, air barrier, vents and any attic heating or cooling equipment.
- Ask which boundary will be insulated and air-sealed, and why that approach suits your climate.
- Check local permit requirements and the adopted energy code before approving the proposed work.
2. Diagnose moisture before covering evidence
Look for roof-deck staining, damp insulation, rusty fasteners, musty odors and wood that appears soft or deteriorated. These clues warrant investigation, not an automatic diagnosis. Dark wood may reflect an old leak; fresh moisture could come from rain, indoor humidity, plumbing or condensation on cold surfaces. Note whether symptoms appear after storms, during freezing weather or after showers. Photographs and a record of timing can help a roofer or building-envelope professional narrow the cause.
Repair the source before adding insulation, and confirm that affected materials are dry enough for the planned assembly. Dryness should be evaluated appropriately, not assumed because a stain feels dry at the surface. Wet or contaminated insulation may need removal, and damaged framing may require further assessment. Avoid painting over stains or spraying a treatment as a substitute for correcting moisture. If water is near wiring or electrical equipment, keep clear and have the hazard evaluated before work resumes.
| Clue | Possible cause | Next step |
|---|---|---|
| Staining near a roof penetration | Flashing or roof leak | Arrange a roof inspection |
| Widespread winter dampness | Condensation from indoor moisture | Assess air leakage, humidity and assembly |
| Wetness near a fan duct | Disconnected duct or duct condensation | Inspect the full exhaust route |
| Soft or sagging roof sheathing | Possible structural deterioration | Get professional assessment before proceeding |
3. Trace every exhaust duct to the outdoors
Bathroom fans must discharge outdoors, not into the attic. A duct aimed toward a ridge vent or laid near a soffit opening is not an outdoor termination. Moist exhaust can settle on cold roof sheathing, especially in winter. Kitchen exhaust and clothes-dryer exhaust also need appropriate outdoor discharge arrangements; they should not be combined with bathroom exhaust. Each system has its own duct-material, routing and termination requirements.
Follow the actual duct rather than relying on what is visible from below. Look for disconnected sections, crushed runs, poorly supported flexible duct and exterior caps that do not open properly. Bathroom exhaust ducts traveling through cold space generally need insulation to limit condensation, along with sealed connections and routing that follows manufacturer instructions and local code. The termination should not let exhaust flow straight back into soffit vents or nearby openings. A fan that sounds powerful may still move little air through a restricted duct.
- Have inaccessible terminations verified from a safe location; do not climb onto a roof just to confirm a cap.
- Use duct connections and sealants appropriate to the specific exhaust system.
- Ask the installer to verify airflow and operation after repairs, not merely reconnect the duct.
4. Air-seal the ceiling before adding depth
In a vented attic, common leakage paths include gaps around plumbing, wiring, ceiling fixtures, wall top plates, dropped soffits and attic access panels. Open chases can connect living areas to the attic over several floors. Fiberglass and loose-fill insulation are not substitutes for a continuous air barrier. Air moving through or around them can carry heat and water vapor into places where neither belongs.
A contractor can use a blower-door test, sometimes paired with infrared imaging under suitable conditions, to locate and prioritize leakage. Small ordinary gaps may accept compatible caulk or sealant; larger openings usually need durable blocking with sealed edges. Heat-producing equipment and required fireblocking demand specific materials and details, not a general-purpose foam approach. Air-sealing work can also change how combustion appliances draft, so homes with fuel-burning equipment may need combustion-safety testing and a ventilation review.
- Seal accessible ceiling-plane leaks before new insulation hides them.
- Weatherstrip and insulate the attic hatch while preserving safe access.
- Keep electrical junction boxes accessible; have an electrician address damaged wiring or questionable connections.
- Ask whether post-work testing will verify leakage reduction and identify any needed mechanical ventilation.
5. Preserve ventilation without treating it as a moisture cure
For a conventional vented attic, new insulation must not obstruct the intended intake and exhaust paths. Baffles at the eaves can maintain an air channel between insulation and roof sheathing; suitable dams help keep loose fill from spilling into soffits. The installation should also prevent wind from washing through insulation at the edges. Vent sizing and distribution depend on the assembly and locally adopted code, so counting visible vents is not enough.
More ventilation is not a substitute for stopping indoor air leaks or repairing a roof. Adding a powered attic fan without evaluating the house can draw conditioned air through ceiling gaps and may affect combustion-appliance draft. Likewise, adding assorted roof vents can alter airflow rather than improve it. Have a professional evaluate blocked vents, short-circuited airflow or unusual roof geometry. If the plan is to convert to an unvented roof assembly, treat that as a redesign requiring climate-appropriate moisture control, suitable materials and code review—not simply closing the vents. In some assemblies, vapor-control details are especially important.
6. Respect lights, chimneys and other hot components
Before insulation is moved or added, identify recessed fixtures and their labels. An IC-rated fixture is designed for insulation contact under its listing; IC does not automatically mean airtight. A non-IC fixture needs the clearance specified by its listing and applicable code. Do not bury it or improvise a cover. Approved enclosures or replacement fixtures may offer a solution, but an electrician should verify compatibility, clearances and access.
Chimneys, metal flues and vents for fuel-burning appliances also need required separation from combustible materials. The necessary clearance depends on the equipment and its listing; a masonry chimney and a listed metal vent are not interchangeable. Do not pack required airspaces with insulation, including noncombustible insulation, unless the approved detail permits it. Where air-sealing is needed, use code-compliant flashing, fireblocking and sealants suitable for the location. Ordinary spray foam is not an acceptable catchall around hot components. Have unclear or concealed conditions evaluated before proceeding. Photograph the completed protective details before loose fill makes them difficult to inspect.
7. Stop for hazards, then specify the finished job
Some findings should pause the project entirely: suspected asbestos-containing vermiculite, extensive mold, animal contamination, active knob-and-tube wiring, structural damage or unsafe footing. Do not disturb suspect vermiculite to inspect beneath it; seek qualified advice about testing and handling. Other hazards may call for an electrician, remediation professional or structural specialist. Ceiling drywall is not a walking surface, and exposed joists are not automatically a safe work platform. Limit entry when access, heat or footing makes inspection unsafe.
Once the attic is ready, request a written scope separating repairs, air sealing, ventilation protection and insulation. Choose the target R-value using climate guidance and local requirements, accounting for existing material rather than specifying depth alone. For blown insulation, ask for product-specific coverage, installed thickness and documentation of the finished work. Preserve service access and required equipment clearances. Compare bids on these details, not just price per square foot. A successful job leaves both better thermal protection and a clear record that moisture, exhaust and safety problems were addressed first.
Consult qualified local professionals and verify current code requirements, product listings and installation instructions before beginning attic work.
AI Assistance Used — AI assistance was used in researching and drafting this article. It was reviewed, edited, and fact-checked by Nadia Clarkson before publication.